Hobbyking Mini OSD - Modding a cheap OSD into a great and cheap OSD
Hobbyking Mini OSD
So, let's get the parts list out of the way asap:
HobbyKing OSD - $26
Upgrade GPS Module - $9
USB TTL 6 Pin Adapter - $5
usbASP Adapter - $3
You can find $1-$2 USB TTL adapters on ebay also. Make sure they're 6 pin.
And here are the download links:
U-Center
U-OSD Direct Download Link
Drivers you can find by googling if windows doesnt install it. Google Fu is an important skill.
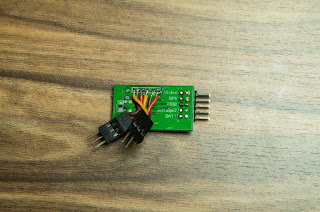
First, you have to take off the plastic surrounding the Mini OSD. Afterwards, flip it around and solder on some servo wires. I forgot to take pictures of mine so I will be using pictures from http://arxangelrc.blogspot.com/. Definitely check him out, he makes great content and designs aircraft too.
Here's a picture that shows where the wires are supposed to go to from your Mini OSD to your usbASP with a 10 pin or a 6 pin layout.
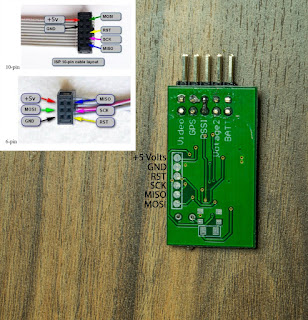
Fig 1
What I did was take a Y splitter cable, similar to this one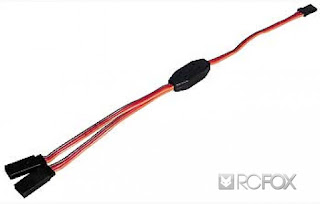
Cut off the ends with the 2 male parts, and stripped down the extra plastic rectangular part at the ends used to guide in another female servo head. After soldering, this is what it looked like.
Now, we can begin flashing software for the MiniOSD.
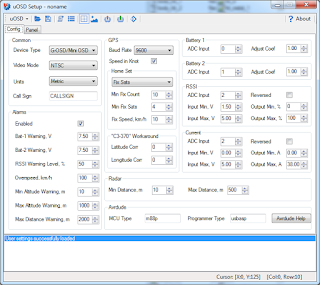
Line up the wires properly to the 10 or 6 pin layout for your usbASP as shown in figure 1, then we can get started. You should get a screen like this.
Here's how you use the software:
1.) Inside folder that you downloaded from the link find the "bin" folder. After you open it, you should see a file called "usetup.exe". Run this file.
2.) Click "update OSD" in the upper taskbar with the icons. You can hover over the icons and it will tell you which is which. After you click, it should give you a warning. Click OK.
3.) In the system monitor at the bottom, you should get updates on how the operation went. It should say something along the lines of "success" at the bottom. If it doesn't, don't worry. As long as it doesnt give you an error we're on the right track, and your osd is properly connected.
4.) Configure your settings. Baud rate for the gps that came with the OSD should be 4800. For now, set it to that and click "Write to OSD" on the upper menu.
Great! We have our OSD in functioning order.
Install uCenter, and connect your GPS with the 6 pin TTL/USB converter. Your 6 pin USB/TTL module should tell which pin is which, connect your GPS module properly. Here is a picture that shows which pin is which on the GPS. (My from banggood came with extra cables that i used to connect to the usb)
 VCC_N is also EN if that matters for your situation at all.
Instructions for setting up the V.KEL VK2828U7G5LF GPS (and possibly other GPS modules with a uBlox chipset) using the uCenter S/W. (Courtesy of RCGroups user TuMadre)
-To set up the GPS unit in uCenter, make sure the baud rate and com port for both the gps and u-center are the same:
A. Click on Reciever on the Main Toolbar (Menu Bar). From this drop down menu:
1. Click Baudrate and select 9600 (OR whatever baud rate your GPS is currently set to).
2. Click Port and select the correct Serial Port for your TTL adapter/GPS Unit.
3. Put a checkmark beside of Autobauding.
B. From the Main Toolbar, Click View, then select Messages View. In the new window that opens below the Main Toolbar you will open the [+] UBXtree, then open the [+] CFG (Config) tree:
1. Click on RATE (Rates)
2. Set Measurement Period to 200 (this automatically changes the Measurement Frequency to 5Hz).
3. At bottom left of the new window, click the Send button (to the right of the padlock and "x" icons).
1. Click on PRT (Ports)
2. Set baud rate to 57600
3. At bottom left of the open window, click the Send button (to the right of the padlock and "x" icons).
Now here is a confusing part:
C. Under the main Config tree, there is another Config tree!
1. Click on CFG (Configuration)
2. Highlight ALL four of the devices shown (very important)!
3. Make sure "Save current configuration" option is marked.
4. At bottom left of the open window, click the Send button (to the right of the padlock and "x" icons).
5. Verify that ALL four of the devices are still highlighted and click the Send button a SECOND time.
D. Go back to the Main Toolbar and click Receiver, then click Action, then click Save Config.
E. Exit from uCenter
F. Disconnect the TTL from the computer to power off the GPS unit.
G. Set OSD baud rate to 57600, and test GPS.
Baud rate is the rate that the OSD and GPS talk to each other. If i know baud rates correctly, consider the rate as the program you use to make a video call. You can use ooVoo, Skype, or facetime. You have to use the same program, or you won't be able to make a video call. The only difference is that higher baud rates also communicate faster. The Baud rate has to be the same for both ends, or they will not be able to communicate. Baud rate is also used in many different things as well.
And that's about it! I've noticed that GPS updates MUCH faster with this new GPS. The old gps is pretty much trash, it's taken me anywhere from 6 to 10 seconds to update, rendering speed useless.
If you have any questions, remember to leave a comment, and i'll try my best to answer as quickly as possible.
USB TTL 6 Pin Adapter - $5
usbASP Adapter - $3
You can find $1-$2 USB TTL adapters on ebay also. Make sure they're 6 pin.
And here are the download links:
U-Center
U-OSD Direct Download Link
Drivers you can find by googling if windows doesnt install it. Google Fu is an important skill.
First, you have to take off the plastic surrounding the Mini OSD. Afterwards, flip it around and solder on some servo wires. I forgot to take pictures of mine so I will be using pictures from http://arxangelrc.blogspot.com/. Definitely check him out, he makes great content and designs aircraft too.
Here's a picture that shows where the wires are supposed to go to from your Mini OSD to your usbASP with a 10 pin or a 6 pin layout.

Fig 1
What I did was take a Y splitter cable, similar to this one

Cut off the ends with the 2 male parts, and stripped down the extra plastic rectangular part at the ends used to guide in another female servo head. After soldering, this is what it looked like.

Now, we can begin flashing software for the MiniOSD.
Line up the wires properly to the 10 or 6 pin layout for your usbASP as shown in figure 1, then we can get started. You should get a screen like this.

Here's how you use the software:
1.) Inside folder that you downloaded from the link find the "bin" folder. After you open it, you should see a file called "usetup.exe". Run this file.
2.) Click "update OSD" in the upper taskbar with the icons. You can hover over the icons and it will tell you which is which. After you click, it should give you a warning. Click OK.
3.) In the system monitor at the bottom, you should get updates on how the operation went. It should say something along the lines of "success" at the bottom. If it doesn't, don't worry. As long as it doesnt give you an error we're on the right track, and your osd is properly connected.
4.) Configure your settings. Baud rate for the gps that came with the OSD should be 4800. For now, set it to that and click "Write to OSD" on the upper menu.
Great! We have our OSD in functioning order.
Install uCenter, and connect your GPS with the 6 pin TTL/USB converter. Your 6 pin USB/TTL module should tell which pin is which, connect your GPS module properly. Here is a picture that shows which pin is which on the GPS. (My from banggood came with extra cables that i used to connect to the usb)

Instructions for setting up the V.KEL VK2828U7G5LF GPS (and possibly other GPS modules with a uBlox chipset) using the uCenter S/W. (Courtesy of RCGroups user TuMadre)
-To set up the GPS unit in uCenter, make sure the baud rate and com port for both the gps and u-center are the same:
A. Click on Reciever on the Main Toolbar (Menu Bar). From this drop down menu:
1. Click Baudrate and select 9600 (OR whatever baud rate your GPS is currently set to).
2. Click Port and select the correct Serial Port for your TTL adapter/GPS Unit.
3. Put a checkmark beside of Autobauding.
B. From the Main Toolbar, Click View, then select Messages View. In the new window that opens below the Main Toolbar you will open the [+] UBXtree, then open the [+] CFG (Config) tree:
1. Click on RATE (Rates)
2. Set Measurement Period to 200 (this automatically changes the Measurement Frequency to 5Hz).
3. At bottom left of the new window, click the Send button (to the right of the padlock and "x" icons).
1. Click on PRT (Ports)
2. Set baud rate to 57600
3. At bottom left of the open window, click the Send button (to the right of the padlock and "x" icons).
Now here is a confusing part:
C. Under the main Config tree, there is another Config tree!
1. Click on CFG (Configuration)
2. Highlight ALL four of the devices shown (very important)!
3. Make sure "Save current configuration" option is marked.
4. At bottom left of the open window, click the Send button (to the right of the padlock and "x" icons).
5. Verify that ALL four of the devices are still highlighted and click the Send button a SECOND time.
D. Go back to the Main Toolbar and click Receiver, then click Action, then click Save Config.
E. Exit from uCenter
F. Disconnect the TTL from the computer to power off the GPS unit.
G. Set OSD baud rate to 57600, and test GPS.
Baud rate is the rate that the OSD and GPS talk to each other. If i know baud rates correctly, consider the rate as the program you use to make a video call. You can use ooVoo, Skype, or facetime. You have to use the same program, or you won't be able to make a video call. The only difference is that higher baud rates also communicate faster. The Baud rate has to be the same for both ends, or they will not be able to communicate. Baud rate is also used in many different things as well.
And that's about it! I've noticed that GPS updates MUCH faster with this new GPS. The old gps is pretty much trash, it's taken me anywhere from 6 to 10 seconds to update, rendering speed useless.
If you have any questions, remember to leave a comment, and i'll try my best to answer as quickly as possible.


Comments
Post a Comment